What Is the Place Called Where You Can Enter the Art Places
1. Before y'all begin
Learn how to utilize Google Maps Platform and the Places SDK for Android to present your users with a list of Places to identify their electric current locations.
Prerequisites
- Basic Java skills
What you'll do
- Add together a map to an Android app.
- Use location permissions to geolocate the user.
- Fetch Places virtually the user's current location.
- Present likely Places to the user to place their current location.
What you'll build
You build your Android app from scratch, but you can download the sample code for comparing when debugging. Download the sample code from GitHub, or, if y'all have Git set upwardly for command-line use, enter the following:
git clone https://github.com/googlecodelabs/current-place-picker-android.git
If yous run into whatsoever bug (lawmaking bugs, grammatical errors, unclear wording, or something else) every bit you work through this codelab, please report the issue via the Study a fault link in the lower left corner of the codelab.
2. Get Started
Before starting this codelab, you lot need to set up upward the following:
Android Studio
Download Android Studio from https://developer.android.com/studio.
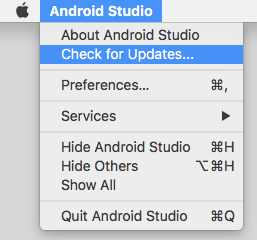
If you already take Android Studio, brand sure you have the latest version by clicking Android Studio > Cheque for Updates....
This lab was written using Android Studio 3.4.
Android SDK
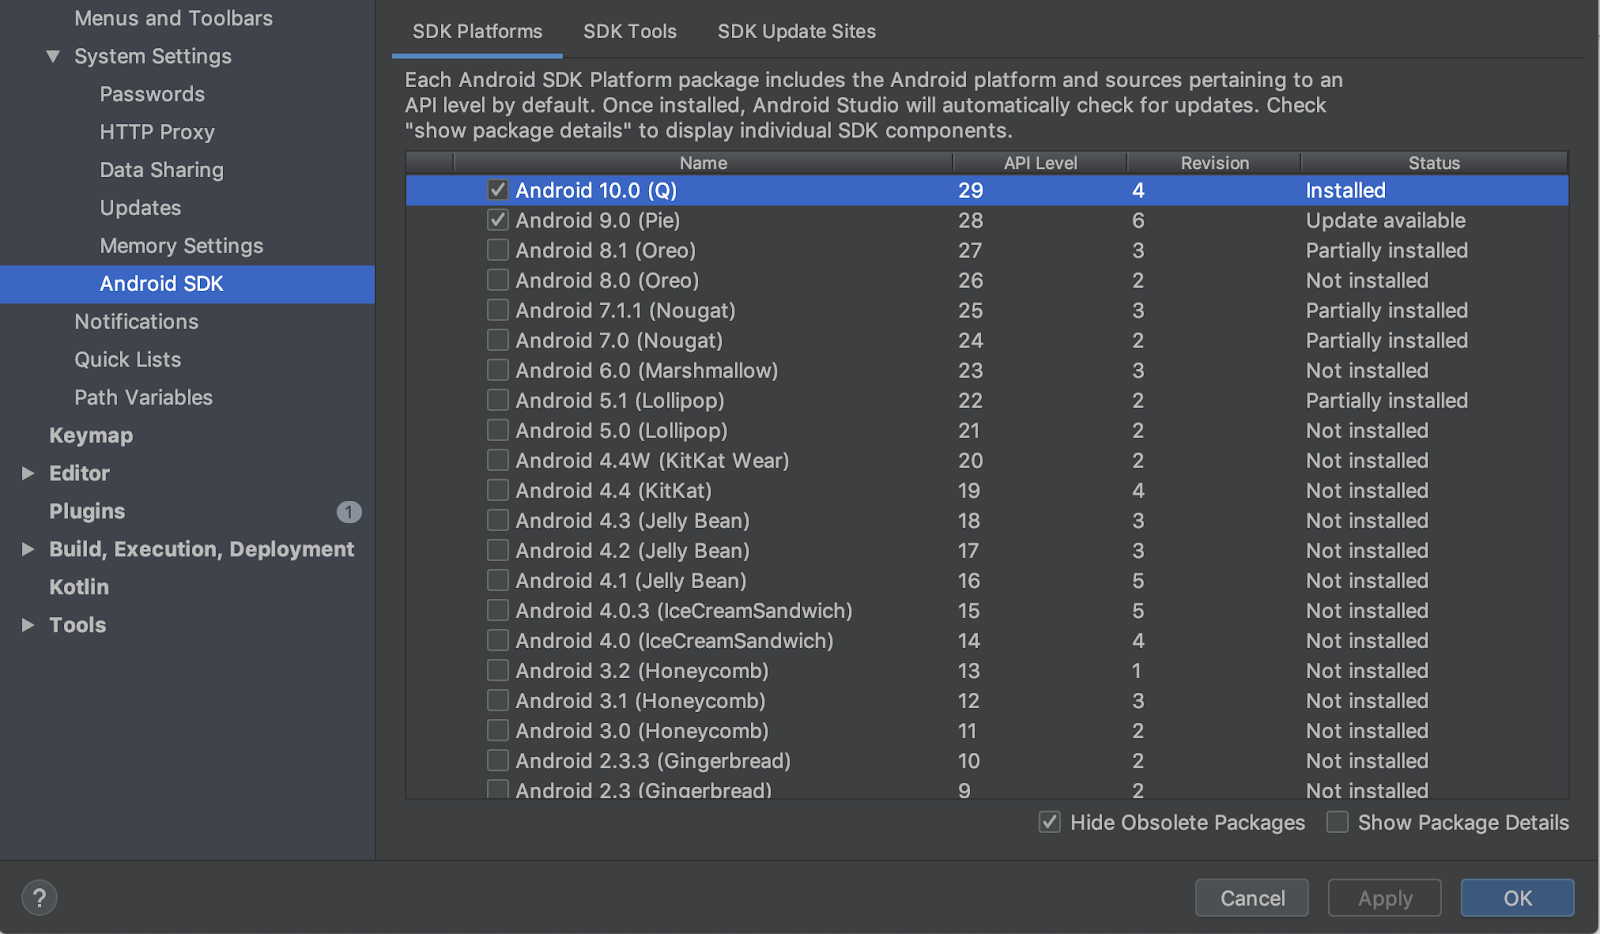
In Android Studio, you can configure your desired SDKs using the SDK Managing director. This lab uses the Android Q SDK.
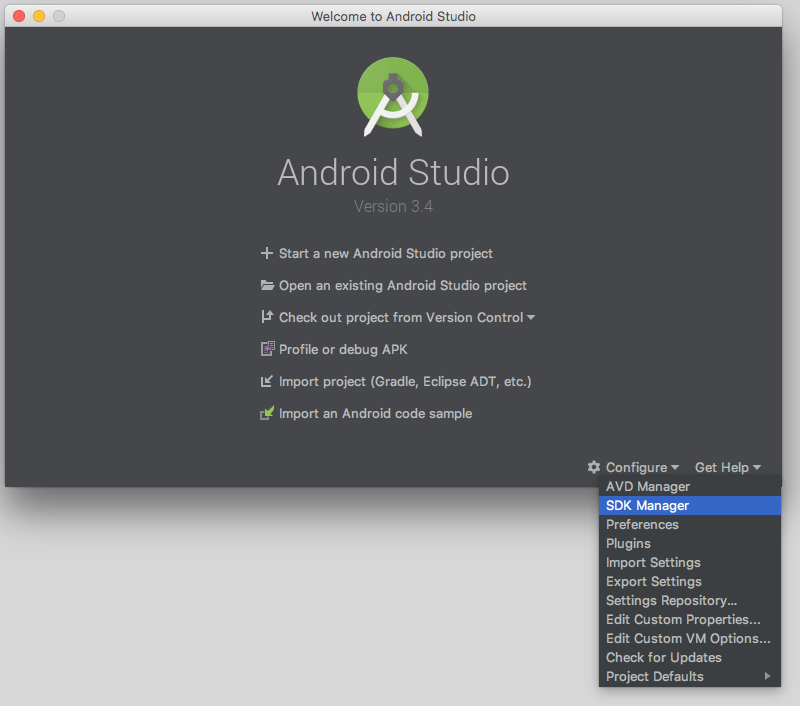
- From the Android Studio welcome screen, click Configure > SDK Manager.
- Select your desired SDK checkbox, so click Apply.
If you don't have the SDK yet, this will initiate downloading of the SDK to your auto.
Google Play services
From the SDK manager, you also need to install Google Play services.
- Click SDK Tools tab and select the Google Play services checkbox.
Update if the condition reads Update bachelor.

3. Prepare the emulator
To run the app, you can connect your own device or use the Android Emulator.
If using your own device, skip to Real device instructions: Update Google Play Services at the end of this page.
Add an emulator
- From the Android Studio welcome screen, click Configure > AVD Manager.
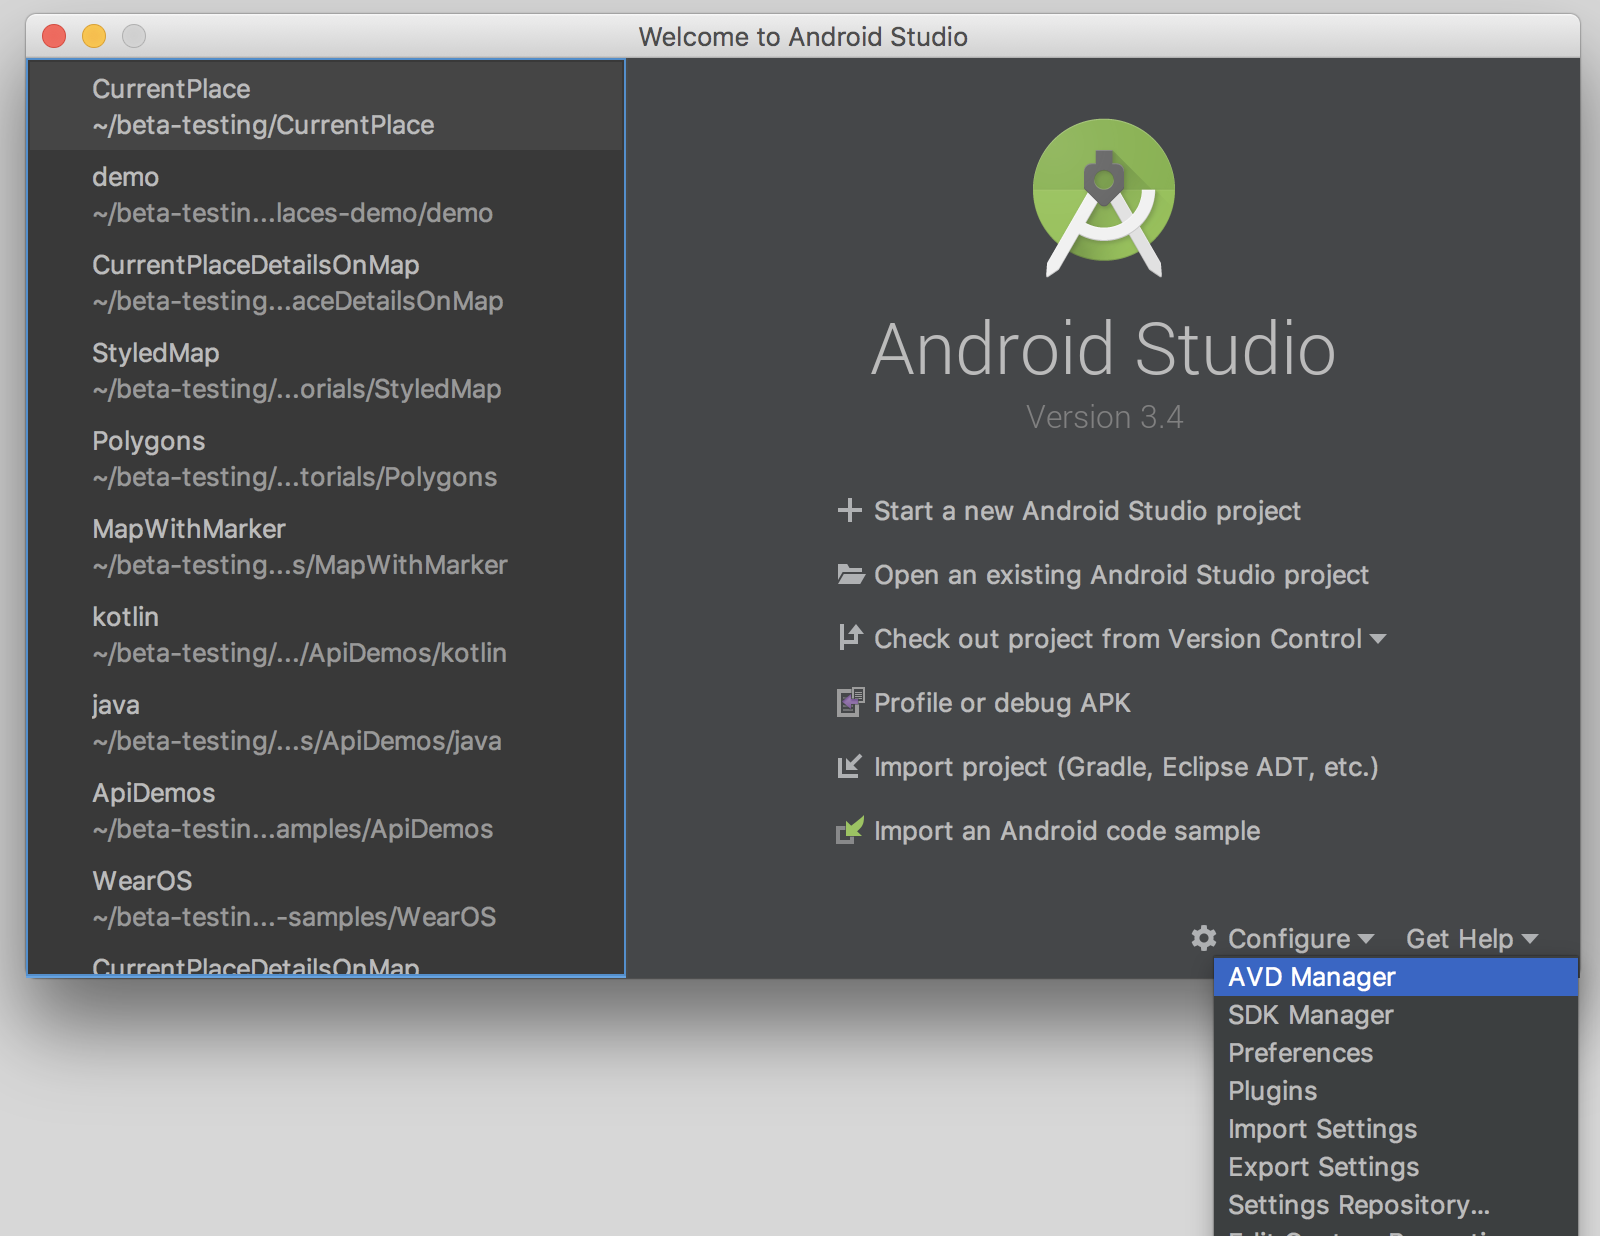
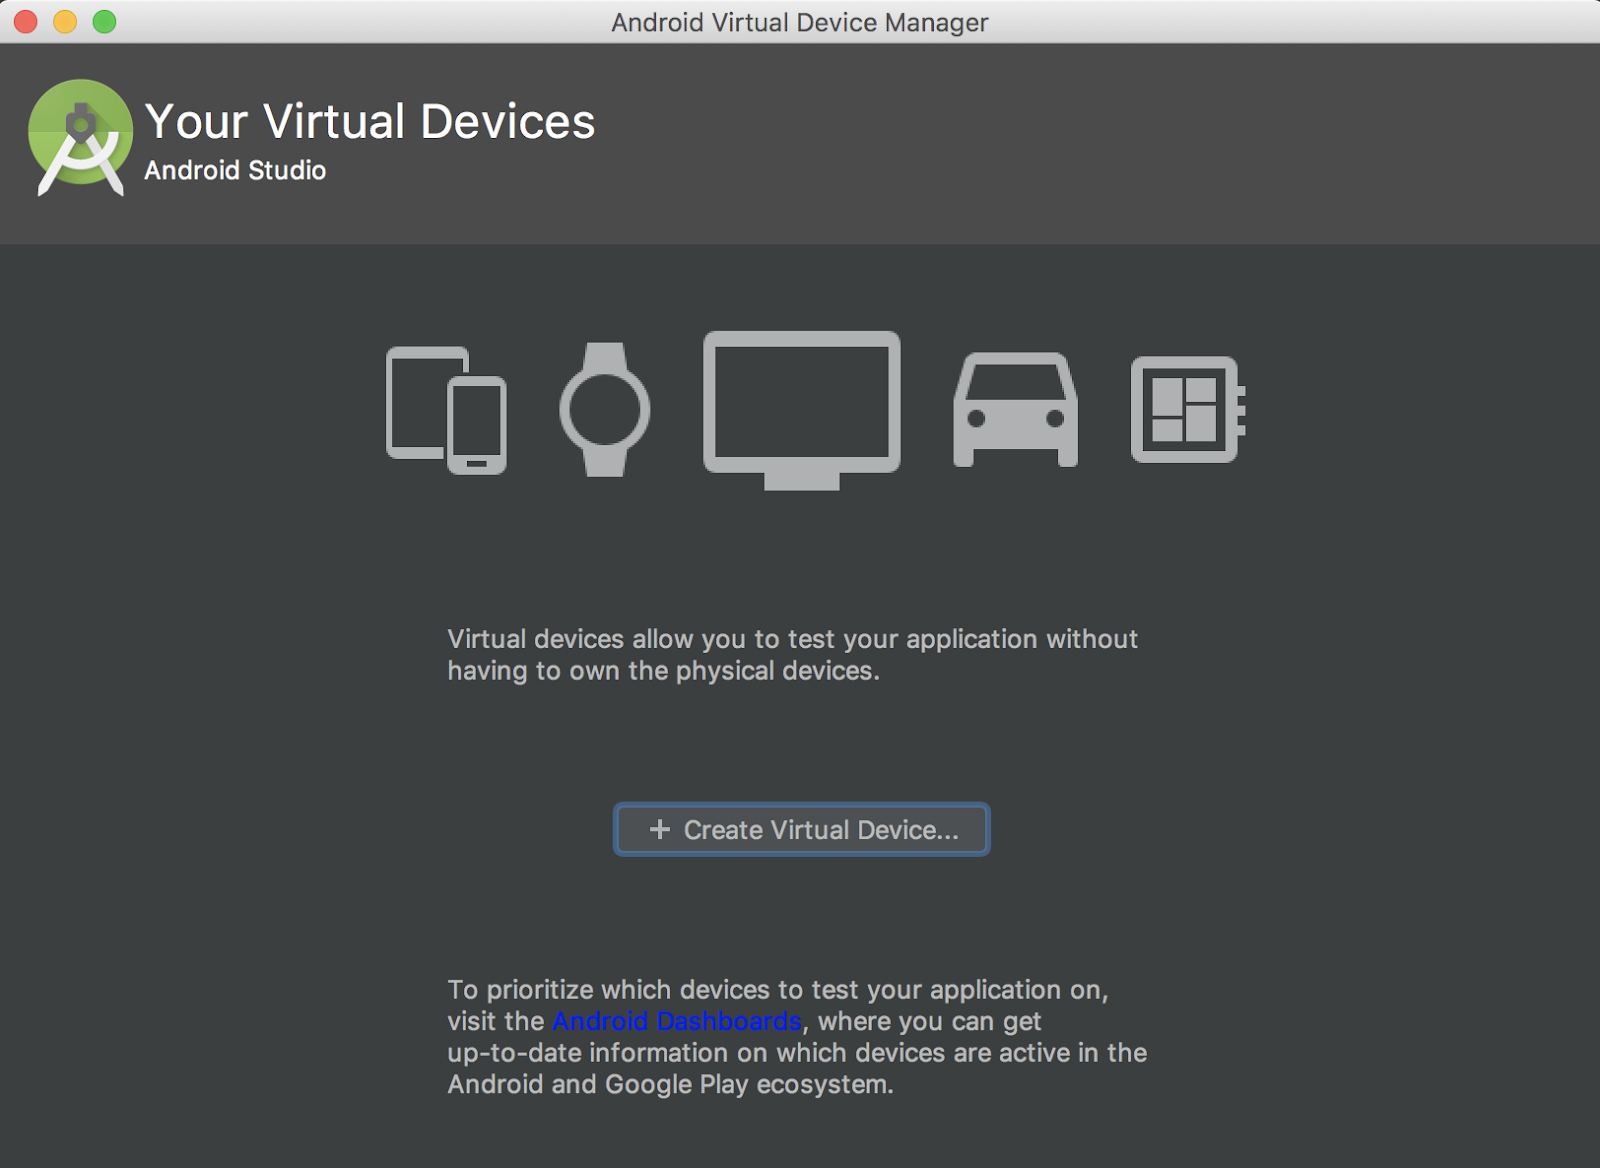
This opens the Android Virtual Device Managing director dialog.
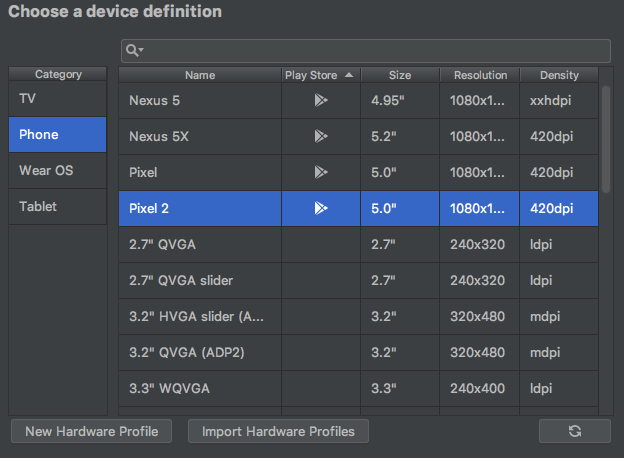
- Click Create Virtual Device... to open a list of devices you tin can cull from.
- Cull a device with the Play
 icon in the Play Store column and click Next.
You lot'll see a set of system images that you can install. If Q targeting Android 9.+ (Google Play) has the word Download next to it, click Download.
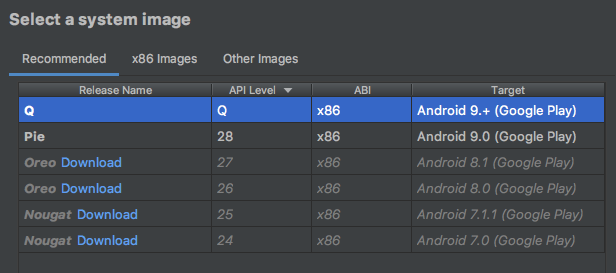
- Click Side by side to give your virtual device a proper name, then click Finish.
You render to the list of Your Virtual Devices.
- Click Start
 side by side to your new device:
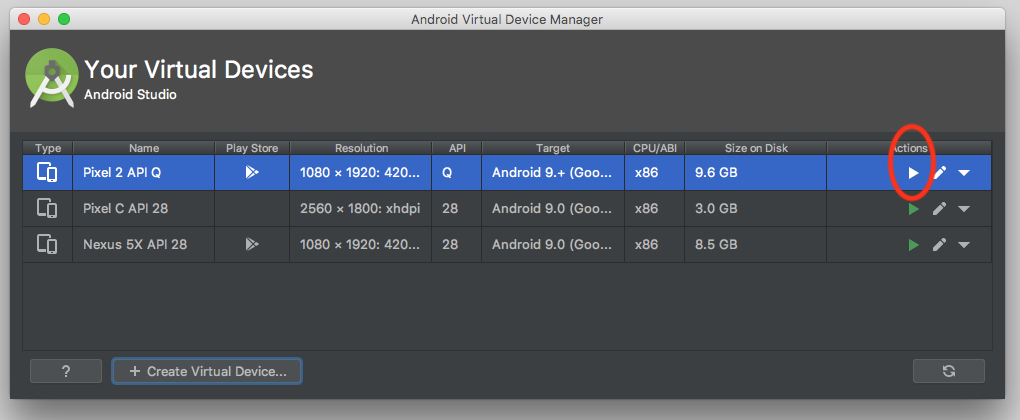
After a few moments, the emulator opens.
Emulator instructions—update Google Play services
- In one case the emulator launches, click ... in the navigation bar that appears**.**
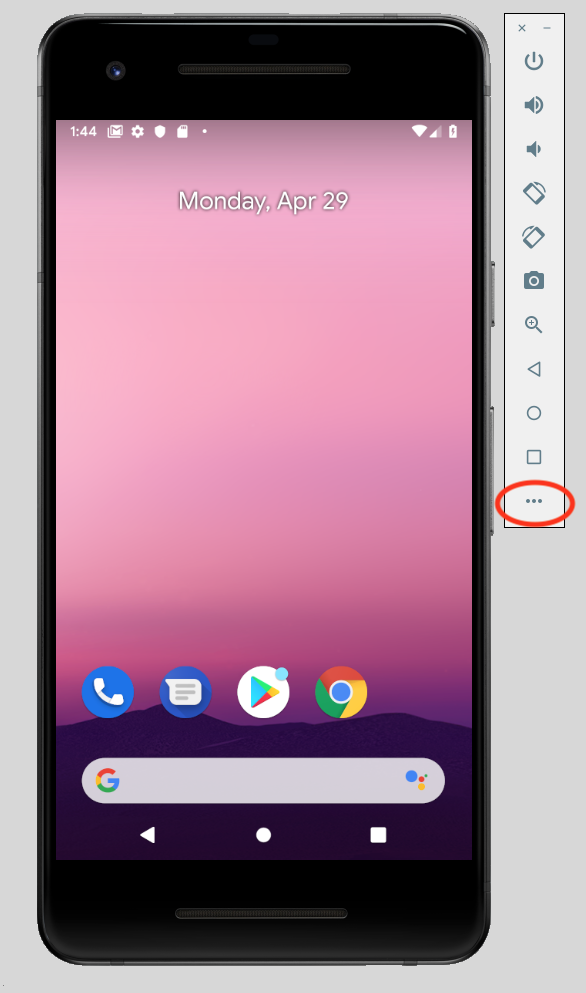
This opens the Extended controls dialog.
- Click Google Play in the menu.
If an update is available, click Update.

- Sign in to the emulator with a Google Account.
You can use your own or create a new account for gratis to keep your testing split up from your personal information.
Google Play then opens to Google Play services.
- Click Update to get the latest version of Google Play services.
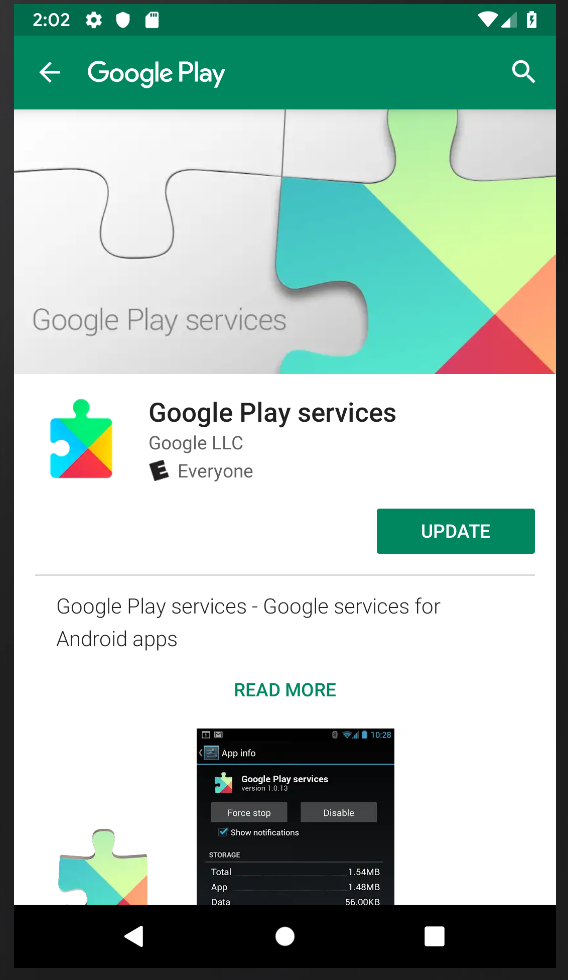
If asked to consummate your account setup and add a payment option, click Skip.
Set location in the emulator
- Once the emulator launches, blazon "maps" into the search bar on the domicile screen to pull up the Google Maps app icon.

- Click the icon to launch.
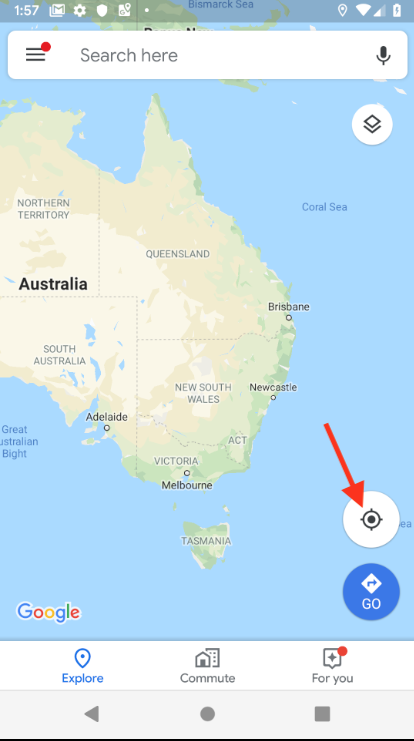
Y'all see a default map.
- At the bottom-correct of the map, click Your Location
 .
.
You're asked to requite the phone permissions to use location.
- Click ... to open the Extended Controls menu.
- Click the Location tab.
- Enter a latitude and longitude.
Enter annihilation you like here, but make certain information technology's in an surface area with plenty of places.
(Use Latitude xx.7818 and Longitude -156.4624 for the town of Kihei on Maui in Hawaii to replicate the results from this codelab.)
- Click Transport and the map updates with this location.
You're ready to run your app and test it with location.
Existent device instructions—update Google Play services
If you lot're using a real Android device, then do the following:
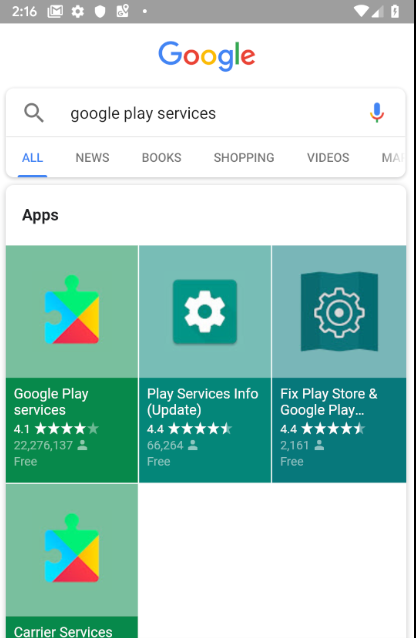
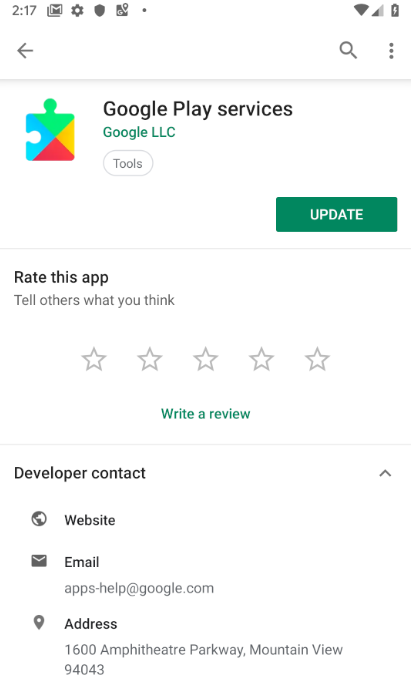
- Use the search bar on the domicile screen to search for, and open up, Google Play services.
- Click More than Details.
If available, click Update.
iv. Create the app trounce with a Google Maps action
- On the Android Studio welcome screen, select First a new Android Studio project.
- On the Telephone and Tablet tab, select Google Maps Activity.
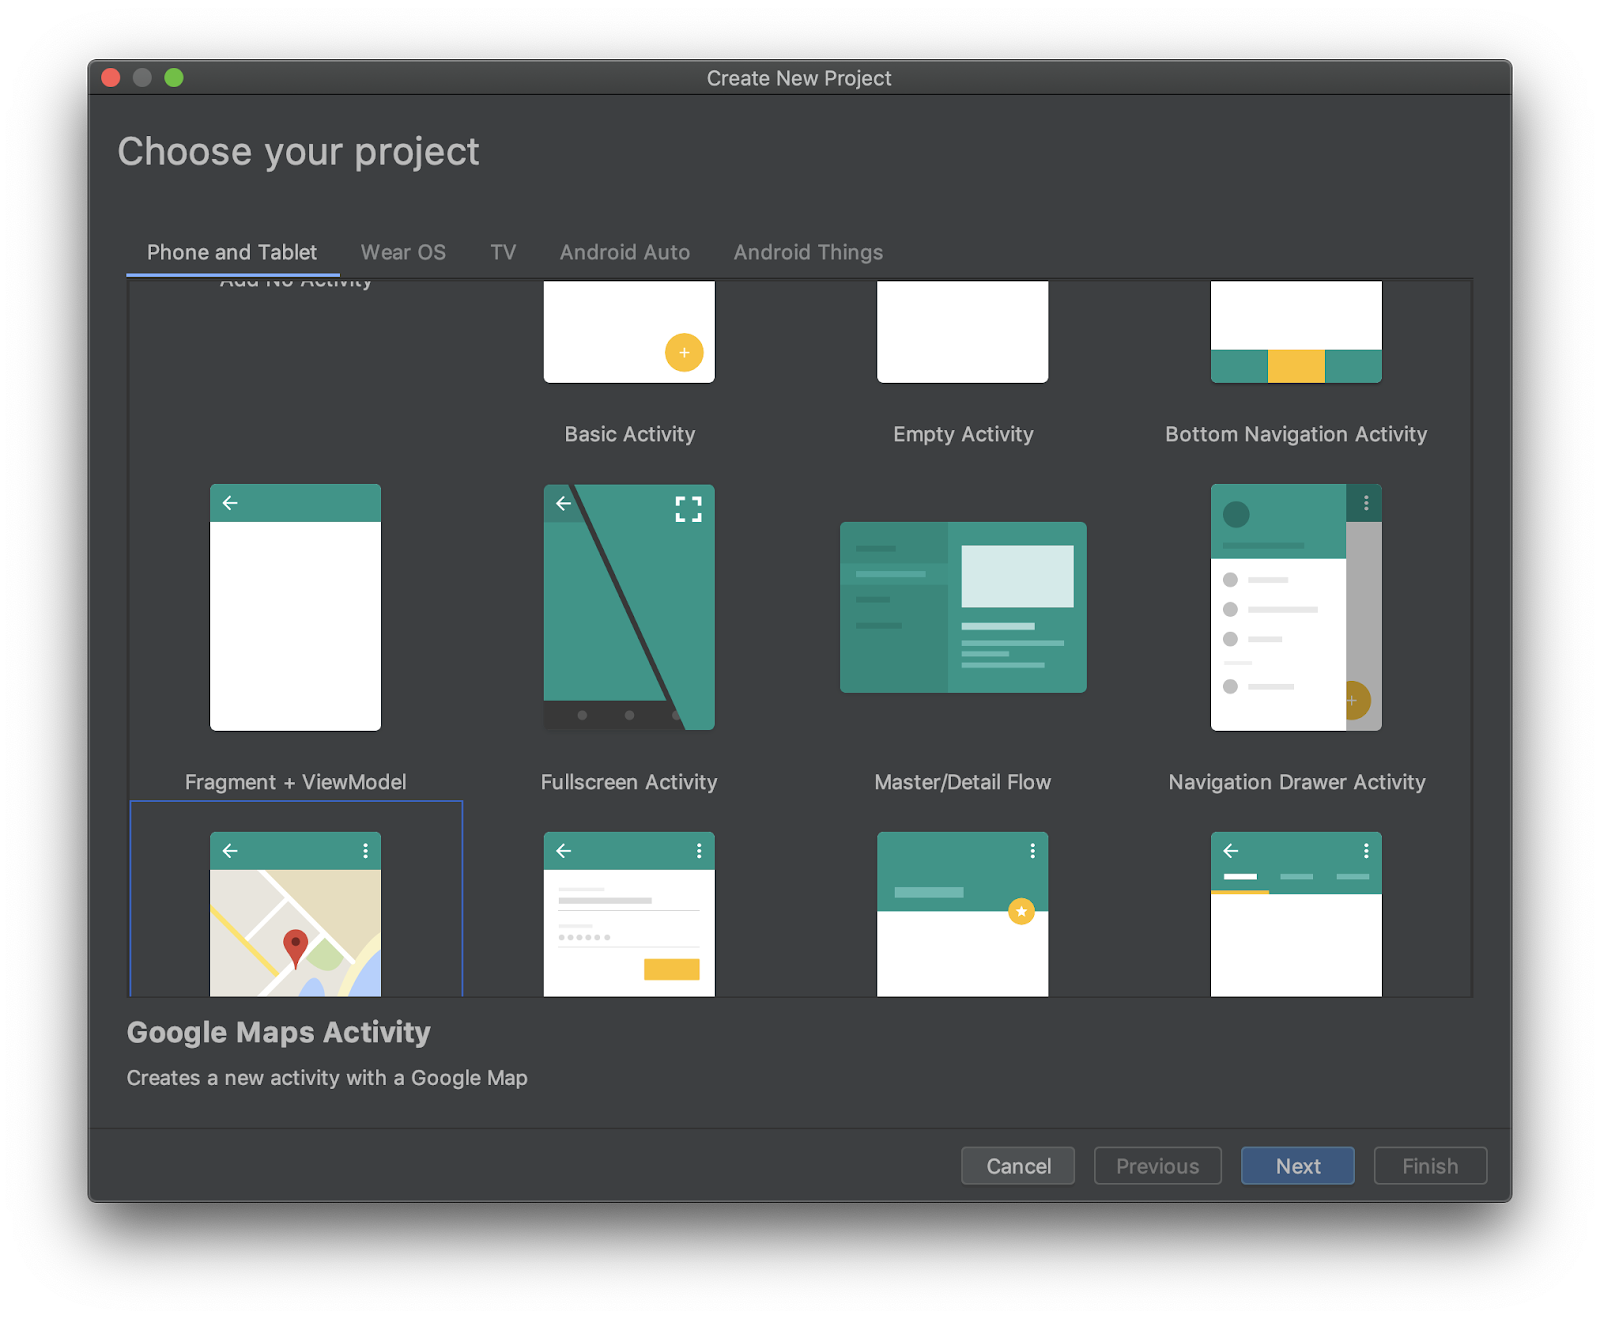
The Configure your project dialog opens. Here is where you proper noun your app and create the package based on your domain.
Hither are the settings for an app called Electric current Place, which corresponds to the package com.google.codelab.currentplace.
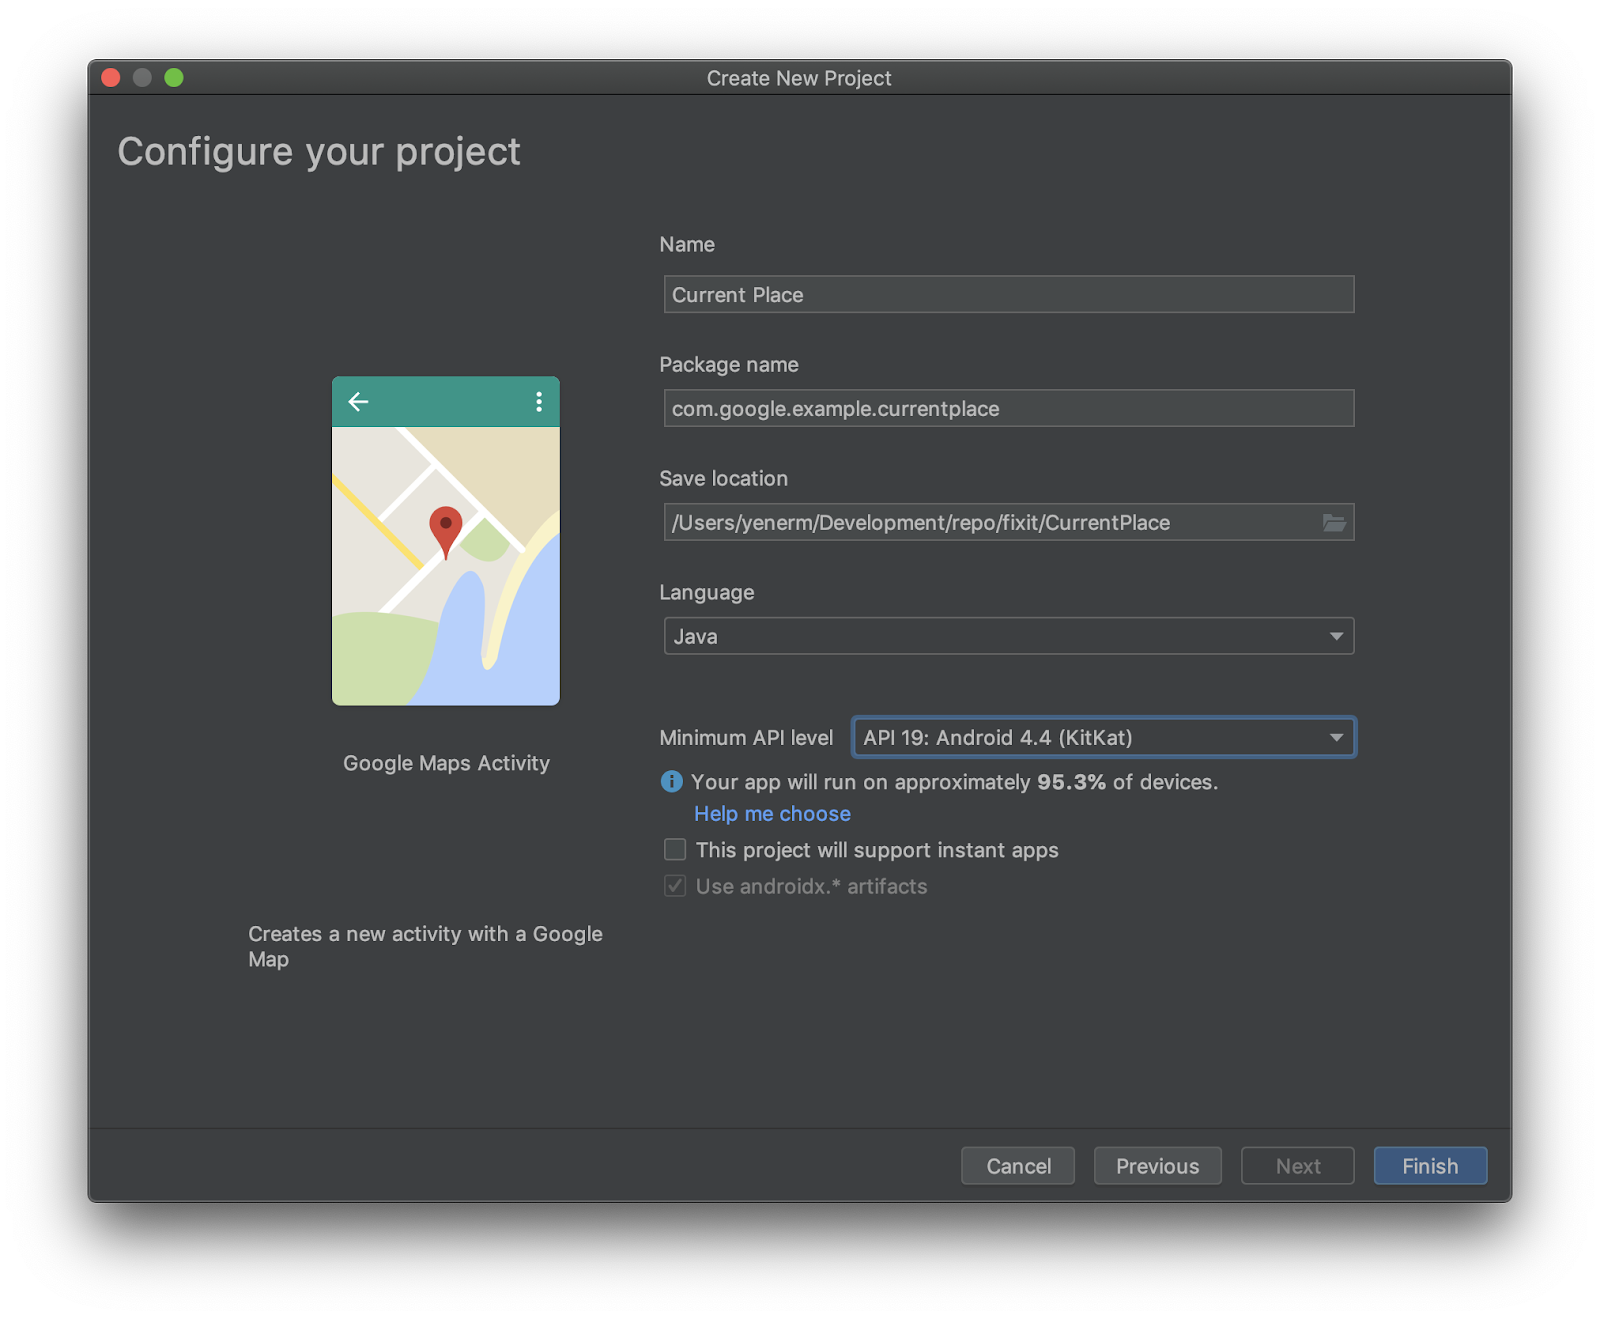
- Cull Coffee as the linguistic communication and select Use androidx. artifacts*.
Keep the defaults for the residuum of the settings.
- Click Finish.
5. Add Google Services dependencies to the Gradle build file
To access location permissions in Android, you need Google Location and Activity Recognition API from Google Play services. For more information on adding this and other Google Play services APIs, see Set up Upwards Google Play Services.
Android Studio projects typically accept 2 build.gradle files. One is for the overall project and 1 is for the app. If you take the Android Studio Projection explorer in Android view, you see both of them in the Gradle Scripts folder. Y'all need to edit the build.gradle (Module: app) file to add Google services.
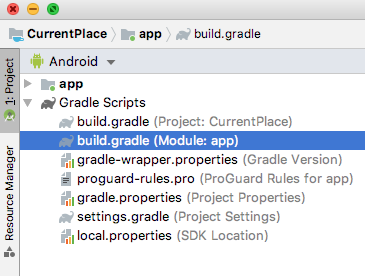
- Add two lines to the
dependenciessection to add Google services for location and the Places API ( sample code in context).
build.gradle (Module: app)
plugins { id 'com.android.application' } android { compileSdkVersion 28 defaultConfig { applicationId "com.google.codelab.currentplace" minSdkVersion nineteen targetSdkVersion 28 versionCode 1 versionName "1.0" testInstrumentationRunner "androidx.test.runner.AndroidJUnitRunner" } buildTypes { release { minifyEnabled simulated proguardFiles getDefaultProguardFile('proguard-android-optimize.txt'), 'proguard-rules.pro' } } } dependencies { implementation fileTree(dir: 'libs', include: ['*.jar']) implementation 'androidx.appcompat:appcompat:1.0.2' implementation 'com.google.android.gms:play-services-maps:16.1.0' testImplementation 'junit:junit:4.12' androidTestImplementation 'androidx.exam:runner:1.1.1' androidTestImplementation 'androidx.test.espresso:espresso-core:3.1.i' implementation 'com.google.android.gms:play-services-location:16.0.0' implementation 'com.google.android.libraries.places:places:i.1.0' } six. Enable Google Maps Platform APIs and get an API fundamental
For the post-obit enablement step , you demand to enable Maps SDK for Android and Places API.
Prepare up Google Maps Platform
If you do non already take a Google Cloud Platform account and a project with billing enabled, please see the Getting Started with Google Maps Platform guide to create a billing business relationship and a projection.
- In the Cloud Console, click the project drop-down menu and select the project that y'all want to use for this codelab.

- Enable the Google Maps Platform APIs and SDKs required for this codelab in the Google Cloud Marketplace. To do so, follow the steps in this video or this documentation.
- Generate an API key in the Credentials page of Cloud Console. You can follow the steps in this video or this documentation. All requests to Google Maps Platform require an API key.
Re-create the API key y'all just created. Switch dorsum to Android Studio, and find the file google_maps_api.xml under Android > app > res > values.
Supercede YOUR_KEY_HERE with the API key you copied.
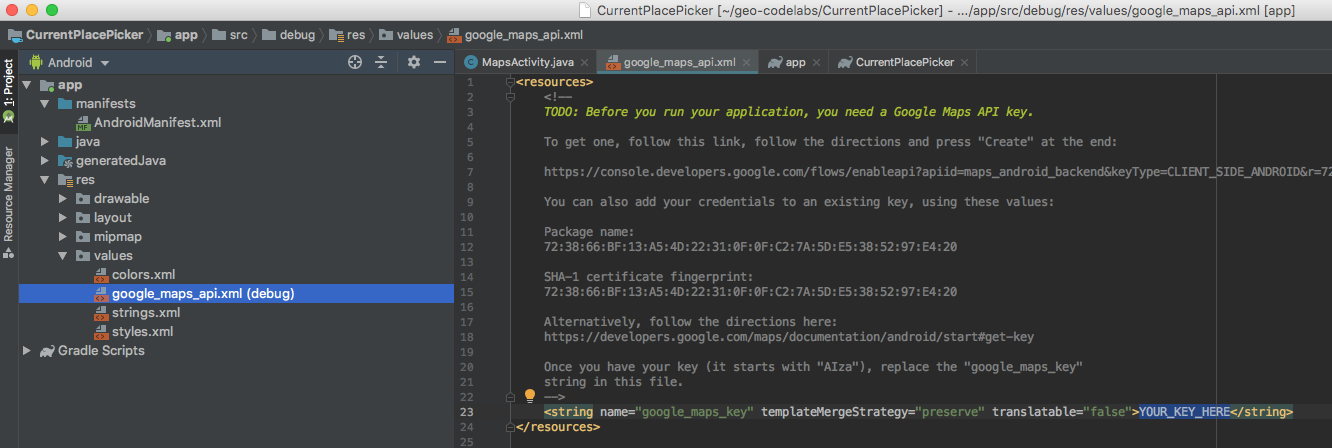
Your app is now configured.
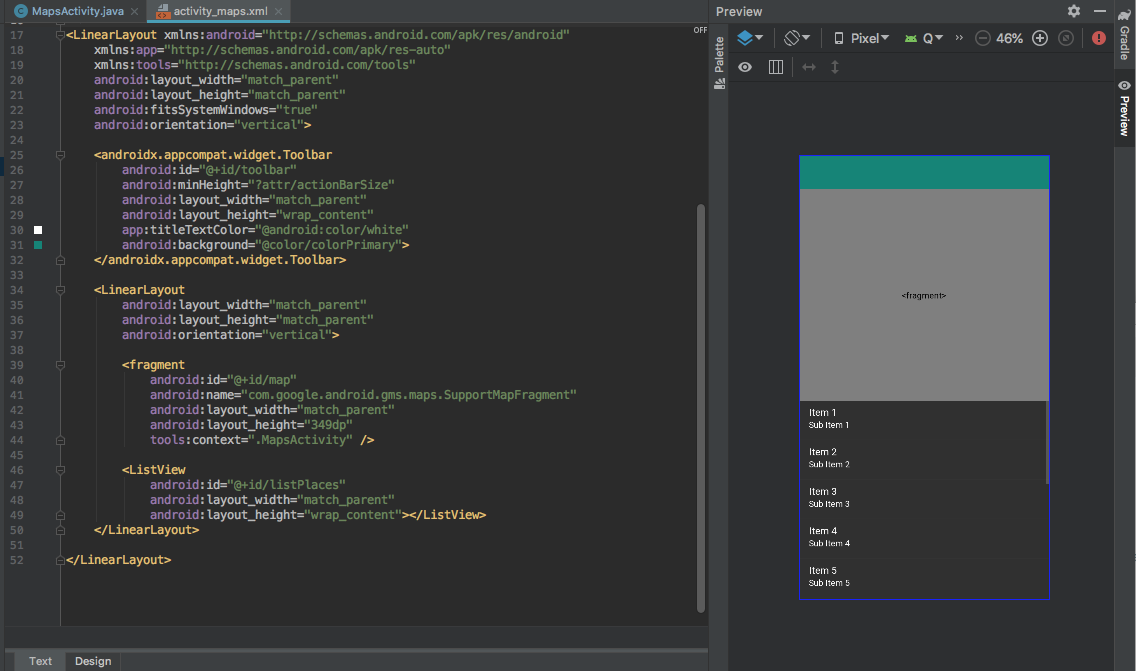
seven. Edit the layout file
- In your project explorer, open up the
activity_maps.xmlfile in the Android >app>res>layout.
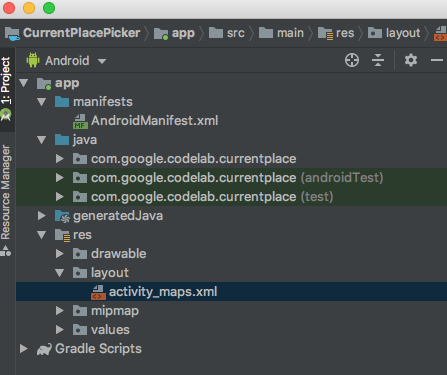
- You'll see the basic UI open up on the right of the screen, with tabs at the lesser allowing you to select the Pattern or Text editor for your layout. Select Text, and replace the entire contents of the layout file with this:
activity_maps.xml
<?xml version="1.0" encoding="utf-8"?> <LinearLayout xmlns:android="http://schemas.android.com/apk/res/android" xmlns:app="http://schemas.android.com/apk/res-auto" xmlns:tools="http://schemas.android.com/tools" android:layout_width="match_parent" android:layout_height="match_parent" android:fitsSystemWindows="true" android:orientation="vertical"> <androidx.appcompat.widget.Toolbar android:id="@+id/toolbar" android:minHeight="?attr/actionBarSize" android:layout_width="match_parent" android:layout_height="wrap_content" app:titleTextColor="@android:color/white" android:groundwork="@colour/colorPrimary" /> <LinearLayout android:layout_width="match_parent" android:layout_height="match_parent" android:orientation="vertical"> <fragment android:id="@+id/map" android:name="com.google.android.gms.maps.SupportMapFragment" android:layout_width="match_parent" android:layout_height="349dp" tools:context=".MapsActivity" /> <ListView android:id="@+id/listPlaces" android:layout_width="match_parent" android:layout_height="wrap_content" /> </LinearLayout> </LinearLayout> This volition give you a user interface that looks similar this:
8. Prepare the app bar
To give the user a push to click when they want to pick their current place, add an app bar with an icon that finds the user's electric current place and displays nearby likely places. It will look similar this:

On a phone, but the icon is shown. On a tablet with more infinite, the text is also included.
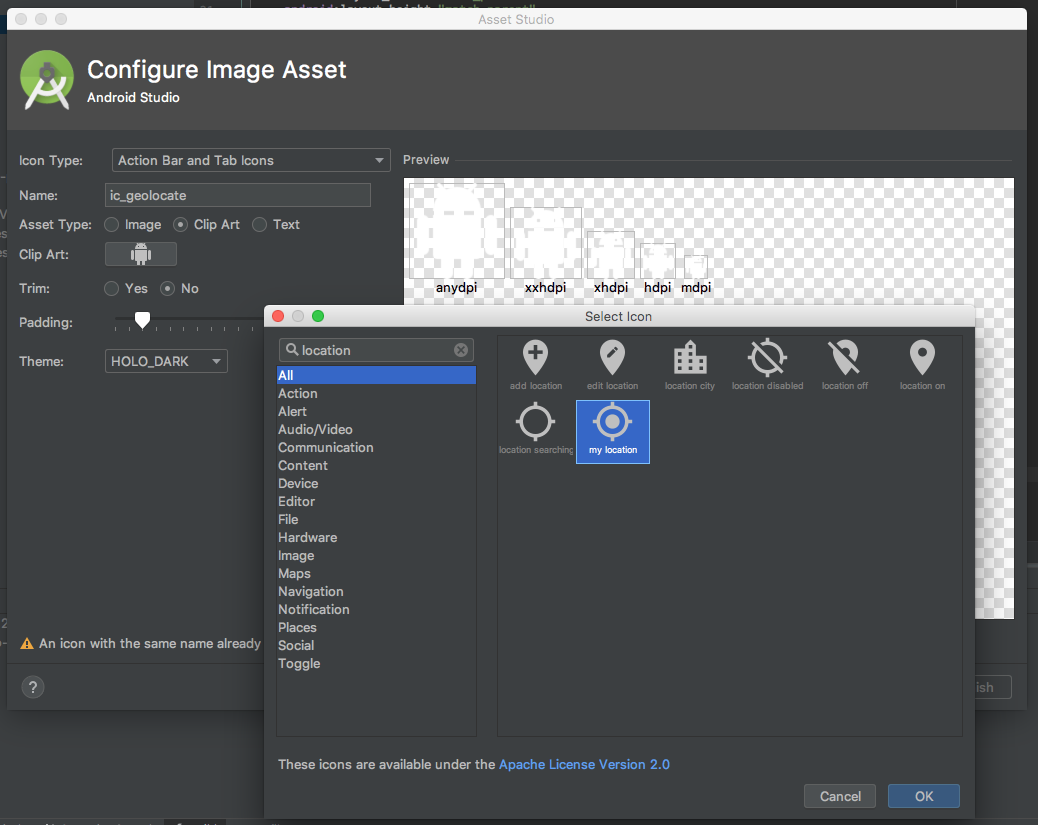
Create the icon
- In the project explorer, click Android > app, so right-click the res folder and select New > Image Asset.
The Asset Studio opens.
- In the Icon Type menu, click Action Bar and Tab Icons.
- Name your asset
ic_geolocate. - Select Clip Fine art as the nugget blazon**.**
- Click the graphic next to the Clip Art.
This opens the Select Icon window.
- Choose an icon.
Y'all tin can use the search bar to find icons related to your intent.
- Search for
locationand pick a location-related icon.
The my location icon is the same every bit the i used in the Google Maps app when a user wants to snap the camera to their current location.
- Click OK > Next > Finish, and ostend there is a new folder called
drawablethat contains your new icon files.
Add cord resources
- In the project explorer, click Android > app > res > values and open the
strings.xmlfile. - Add the following lines later on
<string name="title_activity_maps">Map</cord>:
strings.xml
<string name="action_geolocate">Pick Place</string> <string proper name="default_info_title">Default Location</cord> <cord name="default_info_snippet">No places establish, because location permission is disabled.</string> The first line is used in your app bar when at that place is infinite to include a text label adjacent to the icon. The others are used for markers that you add to the map.
Now the code in the file looks like this:
<resources> <string proper noun="app_name">Current Place</cord> <string proper name="title_activity_maps">Map</string> <cord proper name="action_geolocate">Pick Place</string> <string name="default_info_title">Default Location</string> <cord proper noun="default_info_snippet">No places establish, considering location permission is disabled.</string> </resource> Add together the app bar
- In the project explorer, click Android > app, then right-click the
resfolder and select New > Directory to create a new subdirectory underapp/src/main/res. - Name the directory
menu. - Correct-click the
menufolder and select New > File. - Name the file
carte.xml. - Paste in this code:
<?xml version="ane.0" encoding="utf-8"?> <menu xmlns:android="http://schemas.android.com/apk/res/android" xmlns:app="http://schemas.android.com/apk/res-auto"> <!-- "Locate me", should appear as action button if possible --> <item android:id="@+id/action_geolocate" android:icon="@drawable/ic_geolocate" android:championship="@string/action_geolocate" app:showAsAction="ever|withText" /> </menu> Update the app bar way
- In the project explorer, aggrandize the Android >
app>res>valuesand open the filestyles.xmlinside. - In the
<style>tag, edit the parent property to exist"Theme.AppCompat.NoActionBar". - Note the
nameproperty, which y'all employ in the side by side footstep.
styles.xml
<way name="AppTheme" parent="Theme.AppCompat.NoActionBar"> Update the app theme in AndroidManifest.xml
- Click Android >
app>manifestsand open theAndroidManifest.xmlfile. - Detect the
android:themeline and edit or confirm the value to be@mode/AppTheme.
AndroidManifest.xml
<application android:allowBackup="true" android:icon="@mipmap/ic_launcher" android:label="@string/app_name" android:roundIcon="@mipmap/ic_launcher_round" android:supportsRtl="true" android:theme="@style/AppTheme"> You're now ready to brainstorm coding!
9. Initialize the app
- In your project explorer, discover the
MapsActivity.javafile.
It's in the folder corresponding to the parcel that you created for your app in step 1.
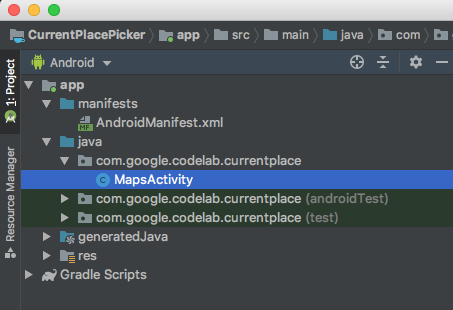
- Open the file and yous're in the Coffee code editor.
Import the Places SDK and other dependencies
Add these lines at the elevation of MapsActivity.coffee, replacing the existing import statements.
They include the existing imports and add together many more used in the code in this codelab.
MapsActivity.java
import androidx.annotation.NonNull; import androidx.appcompat.app.AppCompatActivity; import androidx.appcompat.widget.Toolbar; import androidx.core.app.ActivityCompat; import androidx.core.content.ContextCompat; import android.content.pm.PackageManager; import android.location.Location; import android.os.Bundle; import android.text.TextUtils; import android.util.Log; import android.view.Menu; import android.view.MenuItem; import android.view.View; import android.widget.AdapterView; import android.widget.ArrayAdapter; import android.widget.ListView; import com.google.android.gms.common.api.ApiException; import com.google.android.gms.location.FusedLocationProviderClient; import com.google.android.gms.location.LocationServices; import com.google.android.gms.maps.CameraUpdateFactory; import com.google.android.gms.maps.GoogleMap; import com.google.android.gms.maps.OnMapReadyCallback; import com.google.android.gms.maps.SupportMapFragment; import com.google.android.gms.maps.model.LatLng; import com.google.android.gms.maps.model.MarkerOptions; import com.google.android.gms.tasks.OnCompleteListener; import com.google.android.gms.tasks.OnSuccessListener; import com.google.android.gms.tasks.Task; import com.google.android.libraries.places.api.Places; import com.google.android.libraries.places.api.model.Place; import com.google.android.libraries.places.api.model.PlaceLikelihood; import com.google.android.libraries.places.api.net.FindCurrentPlaceRequest; import com.google.android.libraries.places.api.net.FindCurrentPlaceResponse; import com.google.android.libraries.places.api.net.PlacesClient; import coffee.util.Arrays; import java.util.List; Update the class signature
The Places API uses AndroidX components for astern-compatible back up, and so you need to define it to extend the AppCompatActivity. It replaces the FragmentActivity extension that is defined by default for a maps activity.
public course MapsActivity extends AppCompatActivity implements OnMapReadyCallback { Add class variables
Adjacent, declare the various class variables used in different class methods. These include the UI elements and condition codes. These should exist only below the variable proclamation for GoogleMap mMap.
// New variables for Current Place picker private static final String TAG = "MapsActivity"; ListView lstPlaces; private PlacesClient mPlacesClient; private FusedLocationProviderClient mFusedLocationProviderClient; // The geographical location where the device is currently located. That is, the last-known // location retrieved past the Fused Location Provider. private Location mLastKnownLocation; // A default location (Sydney, Australia) and default zoom to utilise when location permission is // not granted. individual last LatLng mDefaultLocation = new LatLng(-33.8523341, 151.2106085); private static final int DEFAULT_ZOOM = 15; individual static final int PERMISSIONS_REQUEST_ACCESS_FINE_LOCATION = i; individual boolean mLocationPermissionGranted; // Used for selecting the Current Place. private static terminal int M_MAX_ENTRIES = 5; private String[] mLikelyPlaceNames; individual String[] mLikelyPlaceAddresses; private String[] mLikelyPlaceAttributions; private LatLng[] mLikelyPlaceLatLngs; Update the onCreate method
You'll demand to update the onCreate method to handle runtime user permissions for location services, setting upwardly the UI elements and creating the Places API customer.
Add the following lines of lawmaking regarding the action toolbar, views setup, and Places client to the end of the existing onCreate() method.
MapsActivity.java onCreate()
@Override protected void onCreate(Packet savedInstanceState) { super.onCreate(savedInstanceState); setContentView(R.layout.activity_maps); // Obtain the SupportMapFragment and become notified when the map is fix to be used. SupportMapFragment mapFragment = (SupportMapFragment) getSupportFragmentManager() .findFragmentById(R.id.map); mapFragment.getMapAsync(this); // // PASTE THE LINES Below THIS Comment // // Set upward the action toolbar Toolbar toolbar = (Toolbar) findViewById(R.id.toolbar); setSupportActionBar(toolbar); // Set upwardly the views lstPlaces = (ListView) findViewById(R.id.listPlaces); // Initialize the Places customer String apiKey = getString(R.cord.google_maps_key); Places.initialize(getApplicationContext(), apiKey); mPlacesClient = Places.createClient(this); mFusedLocationProviderClient = LocationServices.getFusedLocationProviderClient(this); } These ii methods add the app bar bill of fare (with a unmarried item, the Pick Place icon) and handle the user's click on the icon.
Re-create these two methods into your file afterward the onCreate method.
MapsActivity.coffee onCreateOptionsMenu() and onOptionsItemSelected()
@Override public boolean onCreateOptionsMenu(Bill of fare carte) { getMenuInflater().inflate(R.bill of fare.menu, carte); render super.onCreateOptionsMenu(menu); } @Override public boolean onOptionsItemSelected(MenuItem item) { switch (item.getItemId()) { case R.id.action_geolocate: // COMMENTED OUT UNTIL WE DEFINE THE METHOD // Nowadays the current place picker // pickCurrentPlace(); return true; default: // If we got here, the user's activeness was not recognized. // Invoke the superclass to handle it. return super.onOptionsItemSelected(particular); } } Exam it
- From Android Studio, click Run or Run menu > Run 'app'.
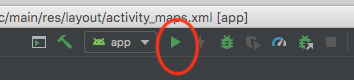
- You're asked to select your deployment target. The running emulator should announced on this list. Select it, and Android Studio deploys the app to the emulator for you lot.
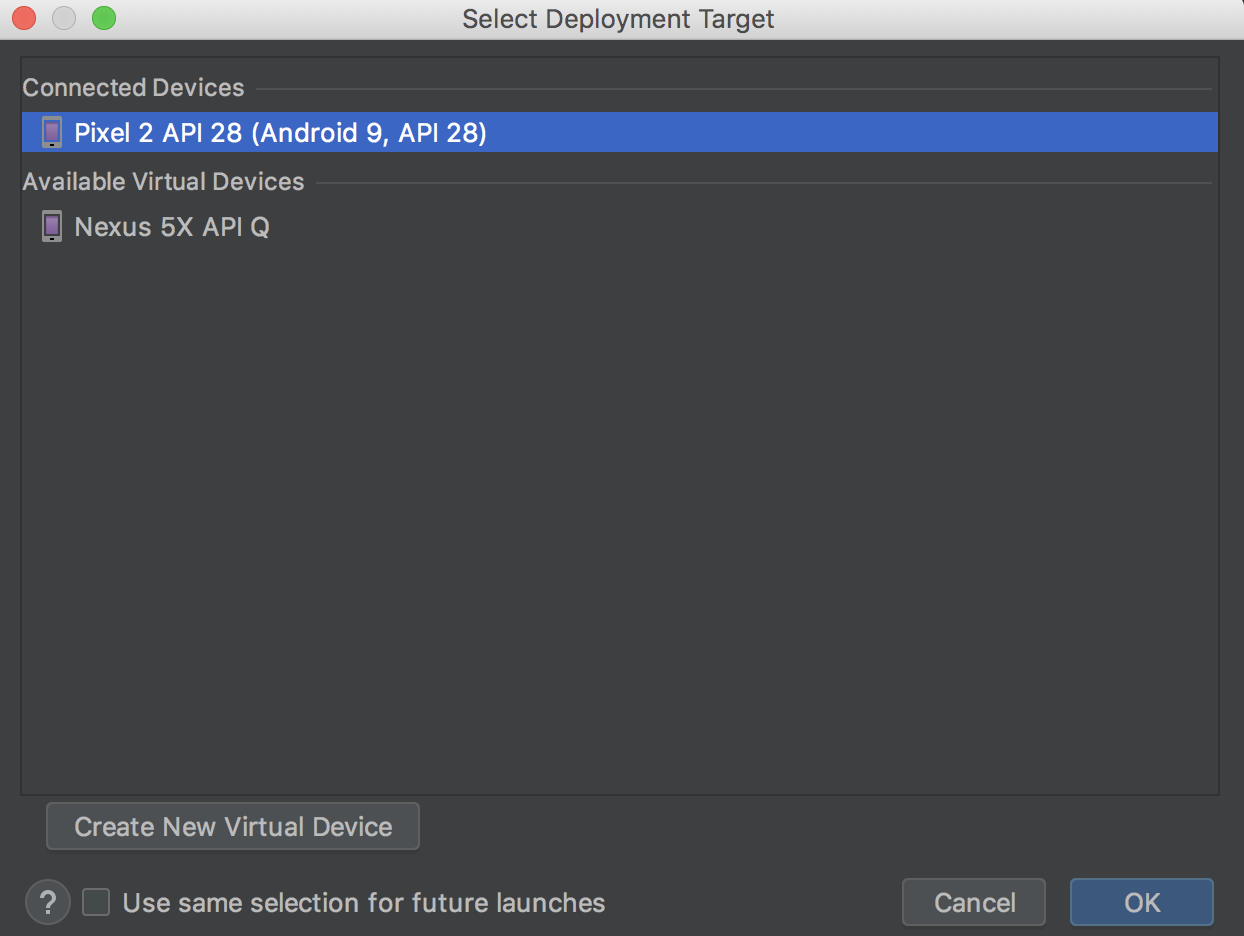
Afterwards a few moments, the app launches. Yous see the map centered on Sydney, Australia, with the single button and unpopulated places list.
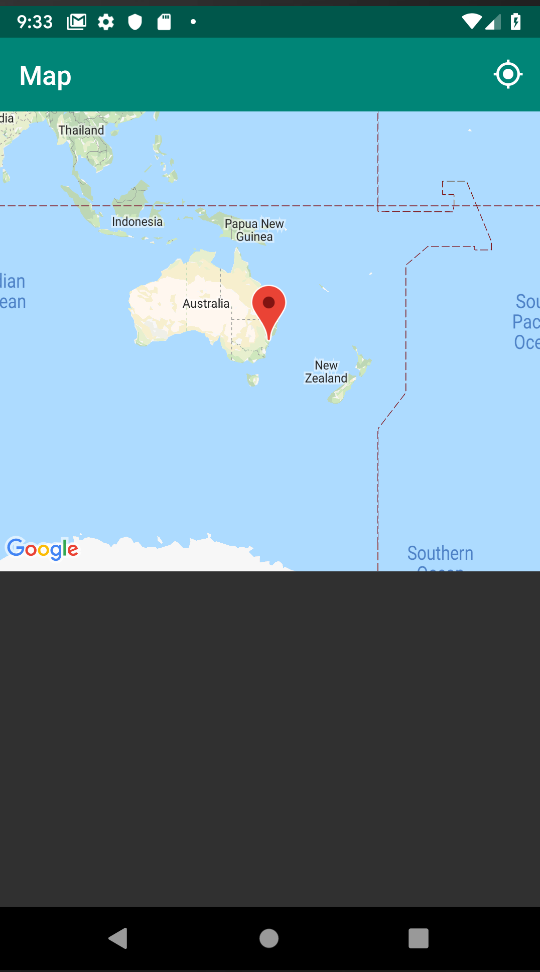
The focus of the map doesn't move to the user's location unless yous request permission to access the device'south location.
10. Request and handle location permissions
Request location permissions after the map is prepare
- Ascertain a method called
getLocationPermissionthat requests user permissions.
Paste this code below the onOptionsSelected method you just created.
MapsActivity.java getLocationPermission()
private void getLocationPermission() { /* * Request location permission, so that we tin can get the location of the * device. The result of the permission request is handled by a callback, * onRequestPermissionsResult. */ mLocationPermissionGranted = false; if (ContextCompat.checkSelfPermission(this.getApplicationContext(), android.Manifest.permission.ACCESS_FINE_LOCATION) == PackageManager.PERMISSION_GRANTED) { mLocationPermissionGranted = true; } else { ActivityCompat.requestPermissions(this, new String[]{android.Manifest.permission.ACCESS_FINE_LOCATION}, PERMISSIONS_REQUEST_ACCESS_FINE_LOCATION); } } - Add together 2 lines to the stop of the existing
onMapReadymethod to enable zoom controls and asking location permissions from the user.
MapsActivity.coffee onMapReady()
@Override public void onMapReady(GoogleMap googleMap) { mMap = googleMap; // Add a marker in Sydney and motion the camera LatLng sydney = new LatLng(-34, 151); mMap.addMarker(new MarkerOptions().position(sydney).championship("Mark in Sydney")); mMap.moveCamera(CameraUpdateFactory.newLatLng(sydney)); // // PASTE THE LINES BELOW THIS COMMENT // // Enable the zoom controls for the map mMap.getUiSettings().setZoomControlsEnabled(truthful); // Prompt the user for permission. getLocationPermission(); } Handle the result from requested permissions
When the user responds to the request permission dialog, this callback is called by Android.
Paste this code after the getLocationPermission() method:
MapsActivity.java onRequestPermissionsResult()
/** * Handles the result of the request for location permissions */ @Override public void onRequestPermissionsResult(int requestCode, @NonNull String permissions[], @NonNull int[] grantResults) { mLocationPermissionGranted = false; switch (requestCode) { example PERMISSIONS_REQUEST_ACCESS_FINE_LOCATION: { // If request is cancelled, the result arrays are empty. if (grantResults.length > 0 && grantResults[0] == PackageManager.PERMISSION_GRANTED) { mLocationPermissionGranted = true; } } } } xi. Get the electric current location and fetch likely places
When the user clicks Pick Identify in the app bar, the app calls the method pickCurrentPlace(), which calls the getDeviceLocation() method you defined before. The getDeviceLocation method calls another method, getCurrentPlaceLikelihoods, after retrieving the latest device location.
Telephone call the findCurrentPlace API and handle the response
getCurrentPlaceLikelihoods constructs a findCurrentPlaceRequest and calls the Places API findCurrentPlace chore. If the chore is successful, it returns a findCurrentPlaceResponse, which contains a listing of placeLikelihood objects. Each of these have a number of properties, including the proper name and address of the identify, and the likelihood probability that you are in that place (a double value from 0 to 1). This method handles the response by constructing lists of identify details from the placeLikelihoods.
This code iterates through the 5 most-likely places and adds ones with a likelihood grater than 0 to a list which information technology then rendera. If you would similar to display more or less than five, edit the M_MAX_ENTRIES constant.
Paste this code after the onMapReady method.
MapsActivity.coffee getCurrentPlaceLikelihoods()
individual void getCurrentPlaceLikelihoods() { // Apply fields to define the data types to return. Listing<Place.Field> placeFields = Arrays.asList(Place.Field.Proper name, Place.Field.ADDRESS, Place.Field.LAT_LNG); // Get the likely places - that is, the businesses and other points of interest that // are the best match for the device's current location. @SuppressWarnings("MissingPermission") final FindCurrentPlaceRequest request = FindCurrentPlaceRequest.builder(placeFields).build(); Job<FindCurrentPlaceResponse> placeResponse = mPlacesClient.findCurrentPlace(request); placeResponse.addOnCompleteListener(this, new OnCompleteListener<FindCurrentPlaceResponse>() { @Override public void onComplete(@NonNull Job<FindCurrentPlaceResponse> task) { if (task.isSuccessful()) { FindCurrentPlaceResponse response = job.getResult(); // Ready the count, handling cases where less than v entries are returned. int count; if (response.getPlaceLikelihoods().size() < M_MAX_ENTRIES) { count = response.getPlaceLikelihoods().size(); } else { count = M_MAX_ENTRIES; } int i = 0; mLikelyPlaceNames = new Cord[count]; mLikelyPlaceAddresses = new String[count]; mLikelyPlaceAttributions = new Cord[count]; mLikelyPlaceLatLngs = new LatLng[count]; for (PlaceLikelihood placeLikelihood : response.getPlaceLikelihoods()) { Place currPlace = placeLikelihood.getPlace(); mLikelyPlaceNames[i] = currPlace.getName(); mLikelyPlaceAddresses[i] = currPlace.getAddress(); mLikelyPlaceAttributions[i] = (currPlace.getAttributions() == null) ? null : TextUtils.join(" ", currPlace.getAttributions()); mLikelyPlaceLatLngs[i] = currPlace.getLatLng(); String currLatLng = (mLikelyPlaceLatLngs[i] == goose egg) ? "" : mLikelyPlaceLatLngs[i].toString(); Log.i(TAG, String.format("Place " + currPlace.getName() + " has likelihood: " + placeLikelihood.getLikelihood() + " at " + currLatLng)); i++; if (i > (count - i)) { break; } } // COMMENTED OUT UNTIL We Define THE METHOD // Populate the ListView // fillPlacesList(); } else { Exception exception = job.getException(); if (exception instanceof ApiException) { ApiException apiException = (ApiException) exception; Log.eastward(TAG, "Identify not found: " + apiException.getStatusCode()); } } } }); } Movement the map camera to the device's current location
If the user grants permission, the app fetches the user'due south latest location and moves the camera to center effectually that location.
If the user denies permission, the app simply moves the camera to the default location defined among the constants at the starting time of this page (in the sample code, information technology is Sydney, Australia).
Paste this code after the getPlaceLikelihoods() method:
MapsActivity.java getDeviceLocation()
private void getDeviceLocation() { /* * Get the best and most contempo location of the device, which may exist nix in rare * cases when a location is not bachelor. */ attempt { if (mLocationPermissionGranted) { Task<Location> locationResult = mFusedLocationProviderClient.getLastLocation(); locationResult.addOnCompleteListener(this, new OnCompleteListener<Location>() { @Override public void onComplete(@NonNull Task<Location> job) { if (chore.isSuccessful()) { // Gear up the map'southward photographic camera position to the current location of the device. mLastKnownLocation = chore.getResult(); Log.d(TAG, "Latitude: " + mLastKnownLocation.getLatitude()); Log.d(TAG, "Longitude: " + mLastKnownLocation.getLongitude()); mMap.moveCamera(CameraUpdateFactory.newLatLngZoom( new LatLng(mLastKnownLocation.getLatitude(), mLastKnownLocation.getLongitude()), DEFAULT_ZOOM)); } else { Log.d(TAG, "Current location is null. Using defaults."); Log.e(TAG, "Exception: %south", task.getException()); mMap.moveCamera(CameraUpdateFactory .newLatLngZoom(mDefaultLocation, DEFAULT_ZOOM)); } getCurrentPlaceLikelihoods(); } }); } } catch (SecurityException e) { Log.e("Exception: %south", e.getMessage()); } } Cheque for location permissions when the user clicks Pick Place
When the user taps Option Place, this method checks for location permissions and prompts the user for permission if it hasn't been granted.
If the user has granted permission, then the method calls getDeviceLocation to initiate the procedure of getting the electric current likely places.
- Add this method after
getDeviceLocation():
MapsActivity.java pickCurrentPlace()
private void pickCurrentPlace() { if (mMap == null) { return; } if (mLocationPermissionGranted) { getDeviceLocation(); } else { // The user has not granted permission. Log.i(TAG, "The user did not grant location permission."); // Add a default marker, because the user hasn't selected a place. mMap.addMarker(new MarkerOptions() .title(getString(R.cord.default_info_title)) .position(mDefaultLocation) .snippet(getString(R.string.default_info_snippet))); // Prompt the user for permission. getLocationPermission(); } } - Now that
pickCurrentPlaceis defined, observe the line inonOptionsItemSelected()that callspickCurrentPlaceand uncomment it.
MapsActivity.java onOptionItemSelected()
instance R.id.action_geolocate: // COMMENTED OUT UNTIL WE Ascertain THE METHOD // Nowadays the Current Place picker pickCurrentPlace(); render truthful; Test information technology
If you run the app now and tap Choice Place, it should prompt for location permissions.
- If yous allow permission, that preference is saved and you won't go prompted. If you lot deny permission, you get prompted the next time you tap the push.
- Although
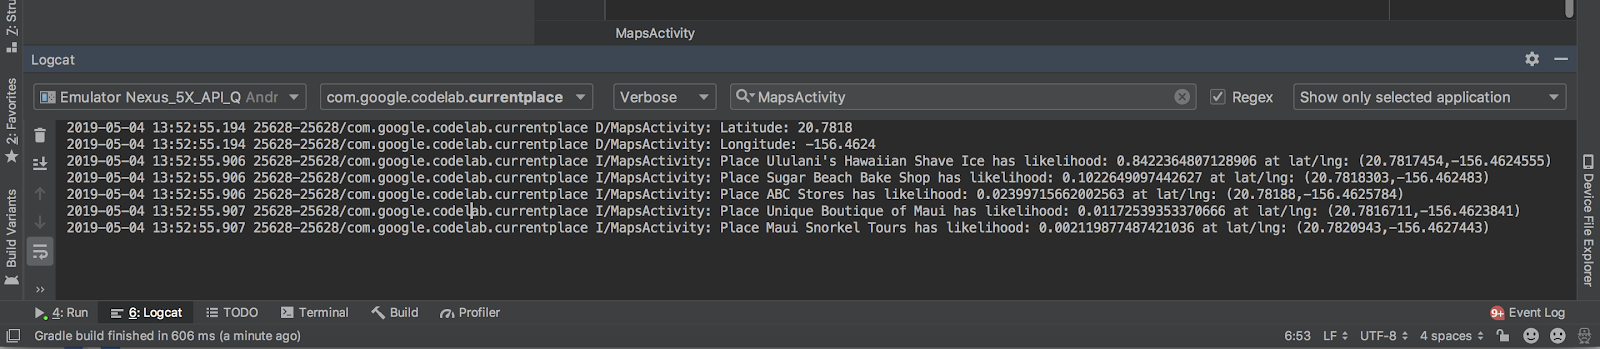
getPlaceLikelihoodshas fetched the likely current places, theListViewdoes non display them all the same. In Android Studio, you can click ⌘6 to check the logs in Logcat for statements tagged MapsActivity to verify that your new methods are working properly. - If y'all granted permission, the logs include a statement for
Latitude:and a statement forLongitude:showing the detected location of the device. If you used Google Maps and the emulator's extended carte before to specify a location for the emulator, these statements show that location. - If the call to
findCurrentPlacewas successful, the logs include 5 statements printing the names and locations of the five almost-probable places.
12. Populate the Current Place picker
Ready a handler for picked places
Let's think near what we want to happen when the user clicks an detail in the ListView. To confirm the user'due south option of which place they are currently, you can add a marker to the map at that place. If the user clicks that marking, an info window pops upwardly displaying the place proper noun and address.
Paste this click handler subsequently the pickCurrentPlace method.
MapsActivity.java listClickedHandler
private AdapterView.OnItemClickListener listClickedHandler = new AdapterView.OnItemClickListener() { public void onItemClick(AdapterView parent, View v, int position, long id) { // position will give us the index of which place was selected in the array LatLng markerLatLng = mLikelyPlaceLatLngs[position]; String markerSnippet = mLikelyPlaceAddresses[position]; if (mLikelyPlaceAttributions[position] != null) { markerSnippet = markerSnippet + "\n" + mLikelyPlaceAttributions[position]; } // Add together a marker for the selected place, with an info window // showing information well-nigh that identify. mMap.addMarker(new MarkerOptions() .title(mLikelyPlaceNames[position]) .position(markerLatLng) .snippet(markerSnippet)); // Position the map'due south camera at the location of the marker. mMap.moveCamera(CameraUpdateFactory.newLatLng(markerLatLng)); } }; Populate the ListView
Now that you have your list of most-probable places that the user is currently visiting, you tin can present those options to the user in the ListView. yous tin can also set the ListView click listener to use the click handler you just defined.
Paste this method afterward the click handler:
MapsActivity.java fillPlacesList()
individual void fillPlacesList() { // Set upwardly an ArrayAdapter to convert probable places into TextViews to populate the ListView ArrayAdapter<String> placesAdapter = new ArrayAdapter<String>(this, android.R.layout.simple_list_item_1, mLikelyPlaceNames); lstPlaces.setAdapter(placesAdapter); lstPlaces.setOnItemClickListener(listClickedHandler); } Now that fillPlacesList is divers, find the line toward the terminate of findPlaceLikelihoods that calls fillPlacesList and uncomment information technology.
MapsActivity.java fillPlaceLikelihoods()
// COMMENTED OUT UNTIL We DEFINE THE METHOD // Populate the ListView fillPlacesList(); That is all the code needed for the Current Place picker!
xiii. Run the app
Test picking a identify
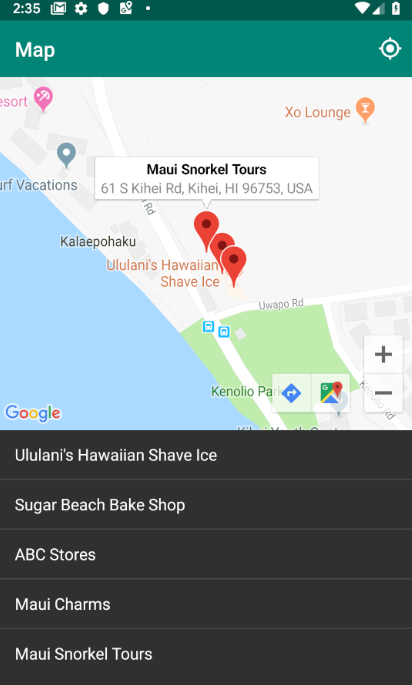
- Run the app again.
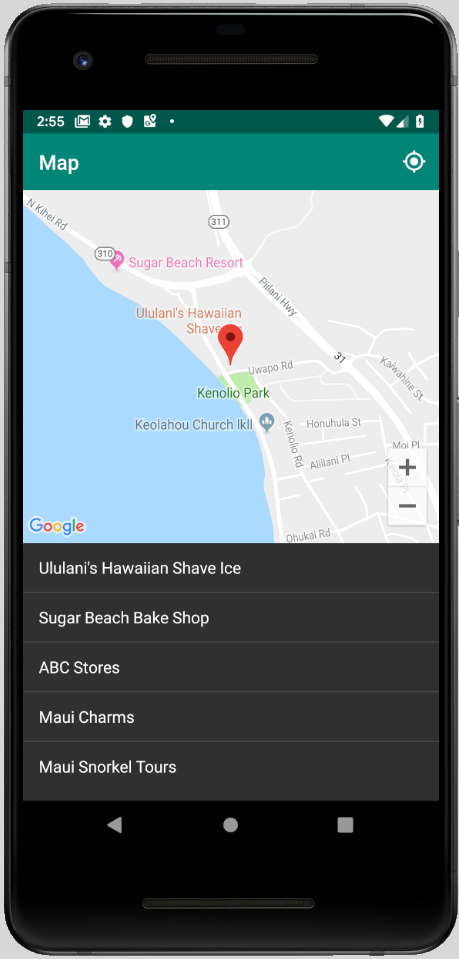
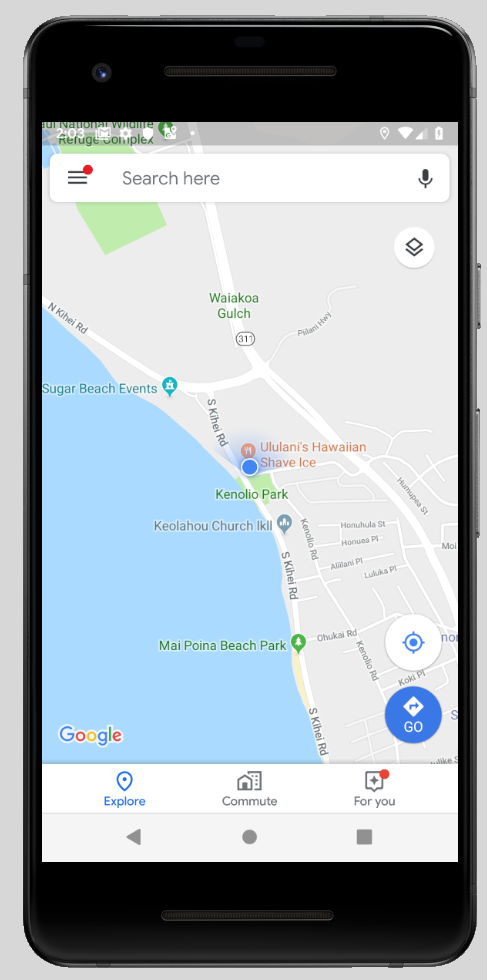
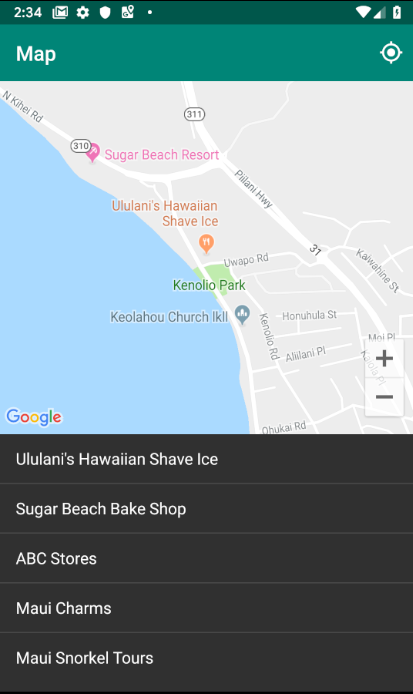
This time when y'all tap Choice Place, the app populates the list with named places close to the location. Close to this location on Maui are places like Ululani's Hawaiian Shave Water ice and Sugar Beach Broil Shop. Considering the several places are very shut to the location coordinates, this is a list of probable places yous may be in.
- Click on a identify name in the
ListView.
You should see a marker added to the map.
- Tap the marker.
You can see Identify Details.
Examination a unlike location
If you lot want to change your location and are using the emulator, the device location doesn't automatically update when you update the location coordinates in the emulator's extended carte du jour.
To get around this, follow these steps to use the native Google Maps app to force updates to the emulator'southward location:
- Open Google Maps.
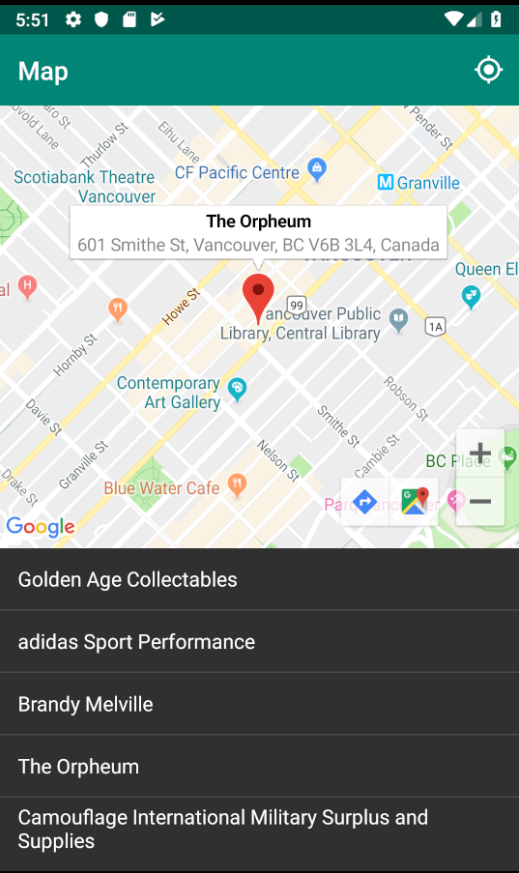
- Tap ... > Location to modify the breadth and longitude to new coordinates, and so tap Send.
- For example, you tin utilize Breadth: 49.2768 and Longitude: -123.1142 to set the location to downtown Vancouver, Canada.
- Verify that Google Maps has recentered on your new coordinates. You may need to tap the My Location push button in the Google Maps app to asking the recentering.
- Render to your Current Place app and tap Selection Place to get the map on the new coordinates and meet a new list of likely electric current places.
And that's it! You built a simple app that checks for the places at the current location and gives you a likelihood of which ones you're at. Bask!
At present go ahead and the run app with the modifications you made to complete this bonus stride!
14. Side by side steps
To preclude theft of your API key, you lot need to secure it and then but your Android app tin utilize the key. If left unrestricted, anyone with your key could employ it to telephone call Google Maps Platform APIs and cause you to get billed.
Get your SHA-i certificate
You need this later when y'all restrict your API keys. The post-obit is a ready of instructions for getting your debug certificate.
For Linux or macOS, open a final window and enter the following:
keytool -list -five -keystore ~/.android/debug.keystore -alias androiddebugkey -storepass android -keypass android
For Windows Vista and Windows 7, run the following command:
keytool -listing -five -keystore "%USERPROFILE%\.android\debug.keystore" -alias androiddebugkey -storepass android -keypass android
You lot should see output like to this:
Alias name: androiddebugkey Cosmos engagement: Jan 01, 2013 Entry type: PrivateKeyEntry Certificate chain length: ane Document[1]: Owner: CN=Android Debug, O=Android, C=US Issuer: CN=Android Debug, O=Android, C=United states of america Serial number: 4aa9b300 Valid from: Mon Jan 01 08:04:04 UTC 2013 until: Monday Jan 01 18:04:04 PST 2033 Certificate fingerprints: MD5: AE:9F:95:D0:A6:86:89:BC:A8:70:BA:34:FF:6A:AC:F9 SHA1: BB:0D:Ac:74:D3:21:E1:43:07:71:9B:62:90:AF:A1:66:6E:44:5D:75 Signature algorithm name: SHA1withRSA Version: 3
The line that begins SHA1 contains the document's SHA-1 fingerprint. The fingerprint is the sequence of twenty double-digit hexadecimal numbers separated past colons.
When yous are set up to release an app, use the instructions in this documentation to remember your release certificate.
Add restrictions to your API cardinal
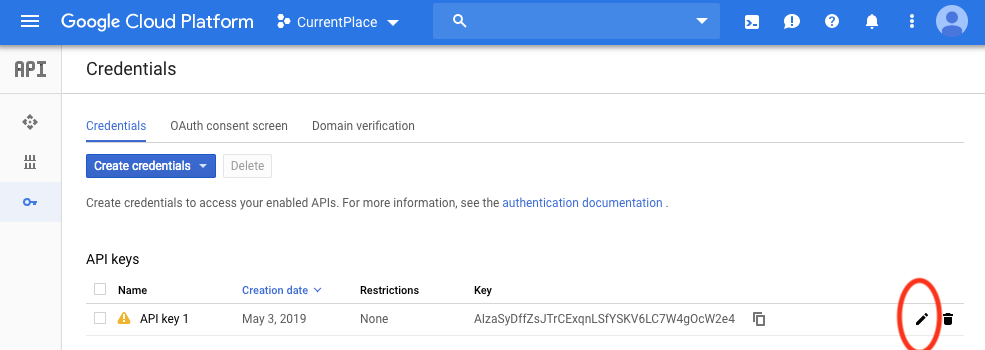
- In Cloud Panel, navigate to APIs & Services > Credentials.
The primal you used for this app should be listed under API Keys.
- Click
 to edit the key settings.
- On the API key page, subsequently Key restrictions, set the Application restrictions by doing the following:
- Select Android apps and follow the instructions.
- Click Add an item.
- Enter your package proper noun and SHA-1 certificate fingerprint (retrieved in the previous section).
For example:
com.google.codelab.currentplace BB:0D:Air-conditioning:74:D3:21:E1:43:07:71:9B:62:ninety:AF:A1:66:6E:44:5D:75s
- For further protection, set the API restrictions by doing the post-obit.
- After API restrictions, choose Restrict central.
- Select the Maps SDK for Android and Places API.
- Click Washed and Save.
15. Congratulations
Yous built a simple app that checks for the most-probable places at the current location and adds a marker to the map for the place the user selects.
Learn more
- To advance your development, leverage the Maps SDK for Android Utility Library. These utilities practice the heavy lifting for some of the virtually popular tasks for apps using Google Maps Platform.
- For more code samples demonstrating most features of the Google Maps Platform SDKs for Android, clone repositories for Maps SDK for Android samples and Places SDK for Android demos.
- To larn how to handle tri-state location permissions in Android Q, complete the Receive location updates in Android with Kotlin codelab.
Source: https://developers.google.com/codelabs/maps-platform/location-places-android
0 Response to "What Is the Place Called Where You Can Enter the Art Places"
Enviar um comentário